Every homeowner or tenant knows the problem: unsightly scratches on the vinyl floor. These signs of wear and tear are usually the result of daily use and various influences.
But don’t worry! There is an innovative, quick and cost-effective solution: BLUFIXX SMART REPAIR. So stay tuned and find out how BLUFIXX can remove scratches from vinyl floors in this blog post.
VINYL FLOORS AND SCRATCHES: THESE ARE THE CAUSES
Scratches on vinyl floors are often the result of wear and tear on the surface. It could be shoes with rough soles, furniture movement or even pet claws – the list goes on.
While some scratches are unavoidable, others can be avoided. Here are some tips that can help you extend the life of your floor:
- Use mats or rugs in high-traffic areas.
- Place felt glides under furniture legs to prevent deeper scratches.
- Keep your pet’s claws short.
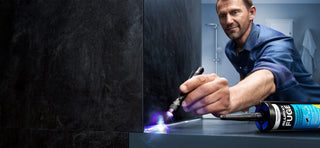
But what if scratches have already occurred? This is where BLUFIXX comes into play! It uses light-curing technology, a method in which a material is cured or hardened by exposing it to light (usually UV or blue LED light). The end result? A quickly repaired, virtually invisible scratch on your vinyl floor.
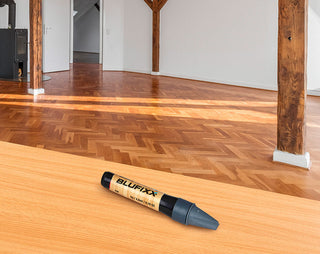
REPAIR SCRATCHES IN YOUR VINYL FLOOR YOURSELF WITH BLUFIXX
The good news is that you no longer have to live with those annoying scratches. With the BLUFIXX SMART REPAIR repair pen for laminate, parquet and vinyl, you can repair minor damage quickly and easily yourself.
This is how it works:
- Step 1: First clean the affected surface thoroughly. It should be free of dust, oil and dirt.
- Step 2: Apply the repair gel to the scratch in layers. The layer thickness should not exceed 2 mm. If necessary, allow the layer to harden and then apply further layers.
- Step 3: Illuminate the gel with the LED lamp for 3 to 15 seconds to allow it to harden. The gel will only harden in the areas reached by the blue light.
- Step 4: Once the gel has hardened, you can finish it as you wish. Sanding, varnishing or polishing – anything is possible.
With BLUFIXX, repairing scratches becomes an easy DIY project!
THE ADVANTAGES OF BLUFIXX FOR REPAIRING SCRATCHES ON VINYL FLOORS
BLUFIXX offers a number of advantages over conventional repair methods. With its innovative light-curing technology and easy application, it is an efficient solution to any scratch problem.
By curing only in the areas exposed to LED light, it enables precise and targeted repairs, which is a great advantage, especially for detailed work. Another advantage is the instant curing.
This means that the repair gel hardens in seconds as soon as it is irradiated with the LED light. A time-saving solution that requires no annoying waiting times.
Here are some highlights of the advantages of BLUFIXX:
- Simple and precise application
- Immediate curing with blue LED light
- No waiting time, ready to use immediately
- Saves time and money compared to new purchases or cost-intensive repairs
- Can be further processed after curing (sanding, painting, polishing)
Expert tip:
For optimum results, make sure to apply the repair gel in thin layers and allow each layer to cure individually. This leads to a stronger and more durable repair.
In short, with BLUFIXX you can give your vinyl floor a new shine and save time and money in the process!
SCRATCH-FREE VINYL FLOORS THANKS TO BLUFIXX
Many of our customers are amazed at the quick and effective solution BLUFIXX offers for repairing their vinyl floors. Whether you are a professional or a DIY enthusiast, BLUFIXX offers a simple, quick and cost-effective solution to extend the life of your vinyl floor. Try it out and experience the difference for yourself!